In this article:
The stencil library includes a wide range of design elements – from simple shapes to complex user interfaces.
In this article, we’ll show you how to narrow your choice, locate the stencils you need, and add them – as objects – to the page. You’ll also learn how to duplicate and rename those stencils.
We’ll also demonstrate how you can use the Quick Draw toolkit – including the Pencil Tool – for fast annotations and swift mockups.
Browse stencil library
To browse the Stencil library, navigate to the Left Sidebar and click on the Stencils Tab. The tab will turn blue, and will open the Stencils Panel.
As you scroll up and down, you’ll see the Stencil library divided into categories. These categories are collapsible and, by clicking on a category name, you can hide or reveal that section.
Our collection of free project Templates will show you how each of these stencil types can be used to create Wireframes & Mockups, Diagrams & Flows, Charts and Graphs, and Business Strategy models. Experiment with these use-case examples to understand best-practices and jump-start your project.
Search stencils
To search for a stencil, use the search input at the top of the Stencils Panel. Searches provide results from all stencil categories.
Ctrl/Cmd + F quickly activates the Search input from the active panel.
If a search locates stencils that are ‘hidden’ in collapsed categories, the number of successful results are highlighted in yellow. Click the highlight to reveal the hidden stencils.
Add stencils to the page
From the Stencils Panel, there are two ways to add a stencil to your page:
- Drag and drop a stencil to a specific place on the page
- Click on the stencil to have it appear in the top-left corner of the page
Duplicate stencils
You can only duplicate stencils once they’ve been added to a page – as objects.
There are three ways to duplicate a stencil:
- While holding down
Option/Alt, click and drag a duplicate away from the original Ctrl/Cmd+Dcreates a duplicate on the page- From the right-click Context Menu, select the Duplicate option
Name & rename stencils
As the complexity of your project grows, renaming your stencils will help keep your project organized – making it easy to identify, and distinguish between other objects on the page.
You can rename any object on the page in two ways:
- At the top of the Format Panel, you’ll find the object’s name in blue text; just click on the text to rename.
- In the Outline Panel, double-click on the object name and type in a new one.
You can also take advantage of Name Sync in the Outline Panel when working with diagram or text stencils:
When you type text into any flowchart stencil, or in the Paragraph, Heading, and Label stencils, those stencils automatically adopt that text as their name. This makes it easy to identify specific objects in the Outline Panel, especially in complex flow and process diagrams, or within detailed designs.
If you don’t want an object labelled with its text, just overwrite the auto-generated name in either the Outline Panel or the Format Panel and it will stick.
In a later article, we’ll explain how to use the Outline Panel to Group and Organize your stencils quickly and effectively.
Quick Draw toolkit
The Quick Draw toolkit makes it fast and easy to sketch up concepts – either as new wireframes, or as annotations to existing designs.
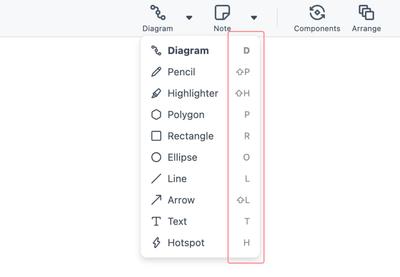
The dropdown arrow next to the Diagram button opens a shortlist of essential shape stencils, as well as the Pencil, Highlighter, Text, and Hotspot tools. Each of these options also have quick keyboard shortcuts.

Clicking on any one of the Pencil, Polygon, Rectangle, Ellipse, Line, or Arrow tools activates Drawing mode. This mode opens a dedicated Drawing section of the Format Panel where you can preset the colors and styles for Fills and Strokes.
While in Drawing mode, click and drag the crosshair-cursor to create one or more objects. At the bottom of the toolkit, the Text button lets you add Paragraph stencils with a click – and just start typing!
Once done, click on the page or hit Esc to exit Drawing mode. Once you return to Edit mode, the shapes you’ve drawn can be grouped or styled just like any other object.
- Draw lines and arrows outward from a center point by holding down
Alt/Optionwhile dragging. - Add start and end markers to both Lines and Arrows as you do with diagram Connectors.
And, with the Quick Draw’s Hotspot tool, you can apply instant Interactions, anywhere on the page, for super-fast prototyping:
Questions & answers
Moqups doesn’t have the stencil I need. What can I do?
If we don’t have the stencil you’re looking for, there are a couple things you can try:
Create a template: A template is a group of stencils that you have combined and styled – together with icons and images – to create a custom stencil. After creating that custom stencil, you can save it as a template for later reuse.
Upload & add an image: You can upload an image that’s similar to the stencil you need. Then, you can crop, format, adjust the opacity, or remove the background of the image to match your design.