In this article:
Moqups has a wide range of text-based stencils that take one of two main forms:
- Single-line text stencils that permit only one line of text, and do not accommodate paragraph returns. These include the Label, Heading, and Text input stencils, and are perfect for headlines, taglines, subheads, titles, and alerts.
- Multi-line text stencils allow for longer text, paragraph returns, checklists, bullet points, and numbered lists. This larger group includes Paragraph, Note and Text Area – as well as stencils in both the Notes & Annotations and Diagram categories.
The variety and flexibility of these stencils means that content writing and design don’t have to happen on different apps – or even on different pages. Copywriters can compose directly on wireframes and mockups – and find the sweet spot where content and form inspire one another.
It’s also worth remembering that many of our Shapes Stencils and UI elements also support and/or include text.
Text-based stencils are found in the Stencils Library and, just like all stencils, they are added to the page, as objects, by drag and drop or a single click.
If you decide that you want a solid background behind your text, the Text area and Text input stencils allow you to add both fill and stroke colors.
Additionally, if you paste copied text directly on the page, Moqups will automatically place it within a Paragraph stencil – just make sure to click on an empty space on the page before you paste!
- Press the
Tkey (or click the Text tool in the Quick Draw dropdown) to add a quick Paragraph stencil to the page – and just start typing! - Press
Tand click on an existing text object to quickly edit text within that object – even if it’s nested in a group.
In this article, we’ll show you how to format text using both the Quick Format Text Toolbar and the Advanced Text Formatting section of the Format Panel.
We’ll also explain how to apply Default Text Settings to all text-based stencils in the library. And, you’ll learn how to search the content of your text stencils, and to use our character counter.
Quick-format text toolbar
When you select text within an object – or double-click on the text area – the Quick-Format Text Toolbar will pop up, allowing you to:
- Apply basic font styling (Bold, Italics, Underline and Strike-Through)
- Create checklists, numbered lists, and bullets
- Add links
- Clear formatting
- Choose from quick color presets
- Highlight text
- Display the character counter by clicking the Show stats button
Select a text-based stencil and hit the Enter/Return key to automatically select all text. This is a quick way to edit, or cut and paste text.
Advanced text formatting
For advanced formatting, go to the Text Section of the Format Panel. Here, you can choose the Font family, Weight, Color, Size, Style – and you can set both the Vertical and Horizontal Alignment.
Clicking the Gear Icon (to the right of the Vertical Alignment buttons) expands the Text Section so you can further refine Line height, Letter spacing, All caps/Small caps, and Auto or Fixed Sizing for stencil Width and Height.
Whenever the text within a stencil exceeds its boundaries, you'll see a [+] icon on its bottom-center selection handle. Double-clicking this icon will adjust the height of the stencil so that it fits the text exactly.
- When you apply Auto Width Sizing to multi-line text, the stencil will adjust to the longest line.
- With single-line stencils, auto sizing will adjust to the full character count of the included text; you cannot add paragraph returns to a single-line stencil.
Font filtering and categories
When you open the font dropdown, the most recently used project fonts display at the top, followed by the five common system fonts, five placeholder wireframing fonts, and finally a list of all fonts in the Moqups library.
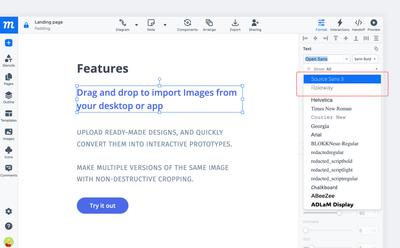
Using the filter at the top of the dropdown, you can choose to ‘Show all fonts’, but you can also narrow your search by picking from 30 categories (i.e. Popular, Sans Serif, Serif, etc.).
Font filtering is handy if you’re trying to match an existing font, or experimenting with different font styles within a design.
Text padding
Many text stencils that are bound by a stroke-line allow for padding around the text within – making it easy to adjust the density of that text.
The stencils that have this feature include the Button, Combo Box, Text Area, Text Input, Date Picker, Stepper, Flowcharts, Note, Sticky Notes, Annotations and Callouts.
Select one of these objects on the page and the Padding section will automatically display within the Format panel. Here you can adjust the horizontal and vertical padding for all four sides of the object – or use the icon in the middle to sync the padding settings.
Name sync with Outline panel
When you type text into a Paragraph, Heading, or Label stencil, it automatically adopts that text as its name. This makes it easy to identify specific objects in the Outline Panel when you are grouping or organizing your page elements.
If you don’t want an object labelled with its text, just overwrite the auto-generated name in either the Outline Panel or the Format Panel and it will stick.
Default text settings
You can quickly set the default text for a wide variety of stencils that include or support text.
The Default Text Settings section appears in the Format Panel when all objects on the page have been deselected by clicking on any empty space on the page or canvas.
Using Default Text Settings
You can choose default settings for Font Family, Font Weight, Text Color, and Font Size.
Default Text Settings automatically apply to all new text objects going forward, but don’t retroactively affect objects that you’ve already added to your project.
Custom Styles vs Default Text Settings
Custom Styles lets you save a style for any particular stencil type. Once you’ve done that, every time you add that stencil to the page, it will adopt that custom style.
Default Text Styles let you set the text style for all stencils that include or support text.
Custom Styles for any stencil type will always override Default Text Styles.
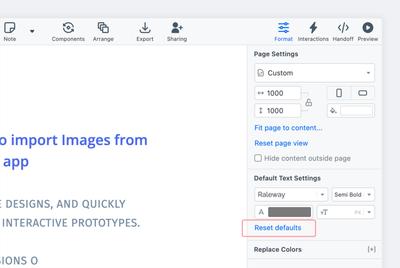
Reset Default Text Settings
The Reset defaults link will reset the fields for the Default Text Setting, but will not affect any saved Custom Styles.
If you want to ensure the Default Text Settings get applied to all stencils that support text, just click on any object on the page and choose Clear all custom styles from the drop-down context menu. And then choose your Default Text Settings.
Because both the Sticky Note and the Note have their own color presets, Default Text Settings won’t affect the Text Color for these stencils.
Paste in format
You can paste lists and CSV data in table, note, flowchart or text formats.
When you copy and paste text lists or CSV data onto your Moqups page, our Paste in Format feature makes it easy to turn that info into instantly populated tables, whiteboards, diagrams:
- Copy your list or CSV from your desktop
- Use
Ctrl/Cmd+Vto paste that data onto the Moqups page - Use the Pick a format modal to choose how you want your clipboard data displayed
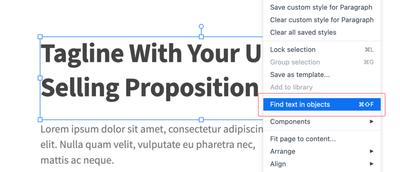
Text search
You can search the content of a project’s objects via keyboard shortcut CMD/CTRL + Shift + F or by selecting the Find text in objects option from the right-click Context Menu.
When searching, you can toggle between finding text on the Current Page or within the Entire Project.
Character counter
There are lots of circumstances that require writing content to strict character or word limits. We’ve made that task a little bit easier by including a character counter in the Quick Format toolbar.
To use the Character Counter:
- Double-click on any text-based stencil to open the Quick Format toolbar
- Click the Show stats button to show or hide the counter
- Click on the display to switch between words and characters.
- Selecting all, or a portion, of the text will give you the current count
- Selecting the entire stencil, but deselecting the text, provides a running count as you type.