In this article:
By grouping individual stencils together, you can speed up and simplify your workflow. Grouped elements – or Compound Stencils – can be moved, adjusted, styled, and duplicated as a single unit.
As you add and group new stencils, your page will become an intricate mosaic of objects: stencils, compound stencils, images and icons. To refine and edit your design effectively, you’ll need to identify and locate both individual objects, and objects nested deep within larger groups.
You can do that quickly and easily. All objects are highlighted when you hover over them on the page; they’re also highlighted when you hover over their object-name in the Outline Panel. This makes the selection of thin or small objects easy and reduces missed clicks.
The Outline Panel helps you manage your page – and streamline your workflow – by keeping all your objects organized within a single, searchable list.
In this article, you’ll learn how to group, lock, arrange, and align objects on the page. We’ll also show you how to navigate and use the Outline Panel to rename, search, reorganize, toggle visibility, and delete objects.
Group and ungroup stencils
When objects are grouped, they can be moved, adjusted, styled, and duplicated as a single unit. Grouping works for all objects: stencils, templates, images and icons.
To group or ungroup objects, use the Group button located in the Contextual Toolbar.
To group stencils:
-
Select stencils:
-
Mouse drag over multiple stencils
or
-
Use
Ctrl/Cmd+ Click to select stencils one at a time
-
-
Group stencils:
-
Navigate to the Contextual Toolbar and click the Group button
or
-
Right-click on one of the objects and choose Group Selection
-
To ungroup stencils:
-
Select the group of objects that you want to ungroup
-
Navigate to the Contextual Toolbar and click the Ungroup button
or
-
Right-click on one of the objects and choose Ungroup Selection
You can also create and nest groups within groups.
To undo group nesting, the keystroke Ctrl/Cmd + Shift + Alt/Option + G unpacks and flattens a group to create a single-layered group.
Edit groups of stencils
Once objects are grouped, you can move, format and style them as a single element. But, you might still want to edit an individual element separately from its group.
To access a single object within a group, double-click on that object. Now, you can format, style or delete that individual element.
Resize constraints
Constraints anchor elements within a design to make adjusting and resizing layouts both quick and easy. Constraints apply only to groups, and do not apply to a selection of objects.
To apply constraints, you first need to enable the feature. Then, you can choose auto constraints, or set anchors manually for each object within the group.
Here’s how it works:
Constraints set resize rules to objects within a group. These rules determine how objects will respond as you adapt the group to new contexts or screen sizes.
Without constraints enabled, the default behavior is simply to ‘stretch’ objects as the group is resized.
With constraints applied, you can resize the group with confidence that the elements will adjust in a logical and predictable way – and won’t ‘break’ the layout that you’ve already established.
Default stretch resize
In Moqups, Constraints are turned off by default. This means that as you resize a group, objects within that group will stretch:
- Objects with an unlocked aspect ratio (like shapes and placeholders) will stretch in the direction that you resize the group.
- Objects with a locked aspect ratio (like icons and avatars) will maintain their proportion, but will get bigger or smaller as you resize the group.
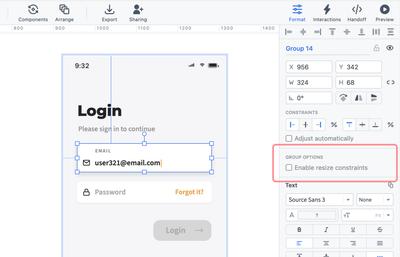
Enable resize constraints
Note that you must already have created a group of objects in order to apply resize constraints.
To enable constraints:
-
Click on group to reveal the Group Options section of the Format panel.
-
Select the Enable resize constraints checkbox.
or
- In the contextual toolbar, click the Enable resize constraints button
-
This will enable our Automatic constraints feature. You can read about Auto vs Manual constraints below.
-
Then, click on any object within the group to open the Constraints section of the Format panel.
Automatic constraints
When you enable Constraints, anchors are automatically applied to each object within the group. These automatic anchors reflect both the layout of the objects, and their most expected and intuitive behaviors upon resize.
To see the automatic anchors:
- Click on any object within the group to open Constraints controls.
- The anchor buttons display the horizontal and vertical constraints that can be applied to the selected object.
- Anchors that have already been applied automatically are highlighted in blue.
- On the page, dotted blue lines indicate where the selected object is anchored.
When you resize the group, automatic constraints should be sufficient to maintain a logical layout for most use cases.
Manual constraints
You can override automatic constraints and select anchors manually for each object within the group. Anchors can be applied both horizontally and vertically.
If you click on any object within the group and hover over the anchor buttons, a tooltip will explain where they anchor that object when selected. You’ll also see the Proportional anchor buttons which we discuss in the next section.
If you anchor an object to both the Left and Right (or to Top and Bottom) the object may stretch accordingly as you resize.
To apply manual constraints to an object:
- Click on any object within the group to open Constraints controls.
- The anchor buttons show the horizontal and vertical constraints that can be applied to the selected object.
- Click on any anchor button to apply it to the object.
- The anchors you select will be visible on the page as dotted blue lines.
- If you want to return to automatic anchors for that object, just re-select the Adjust automatically checkbox.
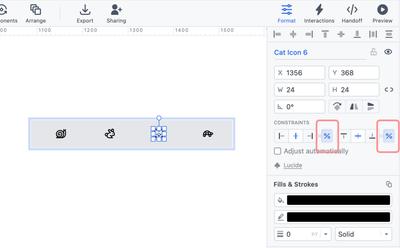
Proportional anchors
Without proportional constraints, objects stay at their fixed position from their anchors (top, bottom, sides, or center) as you resize the group.
Selecting proportional constraints maintains an object’s anchors – whether set automatically or manually – but adjusts the object’s distance from each anchor point proportional to the resize.
To set proportional constraints for an object, click the percentage symbol at the end of the anchor buttons.
The following video demonstrates the default stretch behavior, compared to both auto-constraints and proportional constraints:
Constraints for nested groups
If you enable resize constraints for a parent group, any nested groups are treated like individual objects, and can have either automatic or manual anchors applied to them.
If you want to set anchors for objects within those ‘child’ groups, you’ll need to enable constraints for them separately. After that, you can set anchors for objects within the nested group, just as you would for the larger, parent group.
To enable constraints for a nested group:
- Select the nested group.
- In the Group Options section, choose Enable resize constraints.
- Click on any object within the nested group to open Constraints controls.
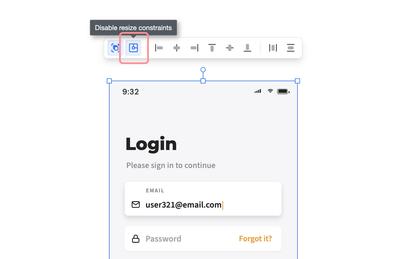
Disable resize constraints
To disable constraints:
-
Click on the group to reveal the Group Options section of the Format panel.
-
De-select the Enable resize constraints checkbox
or
- In contextual toolbar, click the Disable resize constraints button
Lock and unlock stencils
Once an object is locked, it is fixed in place – and can no longer be moved or styled. This allows you to continue editing the rest of the objects on the page without disturbing the completed parts of your design.
In order to work with a locked object, you must first click on it intentionally. To prevent the accidental selection of locked objects, they do not respond to selection by mouse-drag.
To lock a stencil:
-
Select the stencil and then use the right-click Context Menu to choose the Lock Selection option, or use the Keyboard Shortcut:
Ctrl/Cmd+L(this keystroke works for both Lock and Unlock).or
-
At the top of the Format Panel, click the Lock button to the right of the Object Name; once an object is locked, all formatting options for that object will be unavailable until it’s unlocked.
or
-
In the Outline Panel, click the Lock button to the right of the stencil name; the button will darken when locked.
When locked, the stencil will display a red frame on hover and, once the stencil is selected, a lock button will show in the upper-left corner of the red frame. That button can be used to unlock the stencil.
To unlock a stencil:
-
Select the stencil and click the red Lock button on the upper-left corner of the red border.
or
-
Select the stencil and then use the right-click Context Menu to choose the Unlock Selection option, or use the Keyboard Shortcut:
Ctrl/Cmd+L(this keystroke works for both Lock and Unlock).or
-
In the Outline Panel, click the Lock button to the right of the stencil name; the button will be greyed out when unlocked.
To lock or unlock a selection of stencils:
- Select the stencils and then use the right-click Context Menu to choose the Unlock Selection option, or use the Keyboard Shortcut:
Ctrl/Cmd+L(this keystroke works for both Lock and Unlock)
To unlock all objects when there’s a mix of locked and unlocked objects on the page:
- Use
Ctrl/Cmd+Ato select all unlocked objects on the page - Use
Ctrl/Cmd+Lto lock all the objects - Use
Ctrl/Cmd+Lonce more to unlock all the objects
Arrange and align stencils
The Arrange Dropdown in the Top Toolbar allows you to overlay, align and distribute objects to create a clean and balanced design.
Arranging Objects
The Arrange feature lets you stack objects, and then move them back and forth through the layers.
To arrange an object:
- Select the object you want to arrange
- Access the Arrange feature:
-
Navigate to the Top Toolbar and click on the Arrange button to open the dropdown
or
-
Right-click on the object to open the Context menu and hover over the Arrange option to open the dropdown
-
Choose a layering action: Bring to Front, Bring Forward, Send Backward, Send to Back
Aligning Objects
The Alignment feature arranges objects along a common vertical or horizontal axis, and distributes them equally within their shared space.
The Contextual Toolbar is the quickest way to align multiple objects. When you select more than one object, the toolbar automatically appears just above that selection. Along with alignment, the toolbar also allows to quickly group and ungroup the selected objects.
You can also set a reference object – meaning that any selected group of objects will align relative to that object.
To set a reference object, select several objects, and then click on one of them; a thick blue border will immediately appear around that object. All objects will now align relative to that designated reference object. To deselect the reference object, just click outside your selection.
There are three other ways of accessing the Alignment options:
- Navigate to the Top Toolbar, and click on the Arrange button to open the dropdown
or
- Right-click on an object to open the Context menu, and hover over the Align option to open the dropdown
or
- Navigate to the Right Sidebar and open the Format Panel. At the top, you’ll find the Quick Align and Distribute buttons
When a single object (or ‘Grouped’ objects) is selected, alignment controls will align the object relative to the bounds of the page. Note that this function is not available when using the Contextual Toolbar.
Using the Outline panel
The Outline Panel keeps all your objects organized within a single, searchable list.
Browse objects and their hierarchies in the Outline Tree, or use the search input to quickly locate a specific object. The Outline icons in front of object names make it easy to distinguish between stencil types.
Use the Outline Tree to rename, search, reorganize, lock, toggle visibility and delete objects.
To open the Outline Panel:
- Navigate to the Left Sidebar
- Click on the Outline Tab. The tab will turn blue and open the Outline Panel
To select an object in the Outline Panel:
- Click on its name. If you select a Group, click on the Left Arrow icon to quickly view the Group’s content and hierarchy.
You can lock and unlock objects directly from the Outline Panel by clicking the lock button to the right of the object name. Find out more about locking objects here.
To rename an object or group of objects in the Outline Panel:
- The Outline Panel lists all objects on the page: Stencils, Templates, Images and Icons
- Hover over an item in the Outline Tree and, on the page, a blue border will simultaneously highlight the corresponding object
- After you’ve located the object, double click on its name to change it
You can also take advantage of Name Sync in the Outline Panel when working with diagram or text stencils:
When you type text into any flowchart stencil, or in the Paragraph, Heading, and Label stencils, those stencils automatically adopt that text as their name. This makes it easy to identify specific objects in the Outline Panel, especially in complex flow and process diagrams, or within detailed designs.
If you don’t want an object labelled with its text, just overwrite the auto-generated name in either the Outline Panel or the Format Panel and it will stick.
To search for an object in the Outline Panel:
- Select the Search Input at the top of the Outline Panel
- Type in the name of the item you wish to find
To reorder an object or group of objects in the Outline Panel:
- Select the object you want to move
- Drag and drop that object either up or down in the Outline Tree
- Note that moving an object higher or lower within a group hierarchy, or up and down the Outline Tree, will affect its layering-arrangement on the page as well
To hide an object, just toggle the object’s visibility by clicking the Visibility Eye icon to the right of the object’s name in the Outline Tree.
Changing the visibility of an object is essential when adding Interactions. You’ll often want the interaction to start with the object in an invisible state. To learn more about Interactions and prototyping, go here.
To delete an object or group of objects from the Outline Panel:
- Select the object you want to delete
- Use the Delete key to remove that object