In this article:
In Introduction to Workspace, we provided an overview of the Settings button and options.
This article covers how to change the visual theme of the editor. We’ll also show you how to use our rulers, guides, grids, snapping, and measuring features to help speed your workflow as you position objects on the page.
We’ll explain how to show or hide all of these options – and our Hotspots, Zoom controls, and Live Collaboration tools as well.
The next article, Advanced Settings, covers more granular controls that affect what the Editor displays, and how your cursor interacts with objects on the page.
Themes
You can change the appearance of the editor by changing its theme. The default is Light mode, but you can easily switch to Dark, Classic, Neutral or Midnight modes. You can also choose the Match System option if you want Moqups to mirror your browser’s settings.
To change the editor’s theme:
- Click the Settings button towards the bottom of the Left-Sidebar.
- Hover over the Theme option and select from the Light, Dark, Classic, Neutral, Midnight or Match System options.
Page rulers
Page Rulers appear along the left and top margins of your canvas, and are calibrated in pixels.
Rulers are enabled by default, and must be displayed if you want to add Custom Guides to your page.
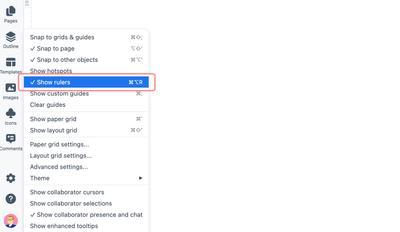
To show or hide rulers:
- Click the Settings button towards the bottom of the Left-Sidebar.
- Select or deselect the Show rulers option from the dropdown.
Custom guides
Adding Custom Guides to the page can help your team with the relative positioning of objects or object-groups.
Guides are visible, as thin blue lines, only in Edit mode, where they serve as temporary layout and alignment tools. They will not be seen when you Preview or Export your page.
When you choose to show, hide or clear guides, you do so for all collaborators with edit rights.
Before adding custom guides, you need to make sure that the Show rulers option from the Settings menu is selected, and that the rulers are visible along the margins of the canvas.
Guides are added and removed from individual pages, but the Show custom guides option applies to the project as a whole.
Add Guides
To add a horizontal or vertical guide:
Click on any point along the ruler
or
Click and drag from the ruler towards the page
Show or Hide Guides
In the Settings dropdown, the Show custom guides option is selected by default. When deselected, it will automatically be re-enabled if you click anywhere along the rulers.
To show or hide guides:
- Click the Settings button towards the bottom of the Left-Sidebar.
- Select or deselect the Show custom guides option from the dropdown.
- Your choice will apply to the project as a whole.
Adjust or Remove Individual Guides
To adjust individual guides, hover over the blue line until you see the adjustment tool, and then click and drag the guide to relocate it.
To remove individual guides from a page, hover over the blue line until you see the adjustment tool, and then click and drag the guide off the canvas and past the ruler.
Clear All Guides
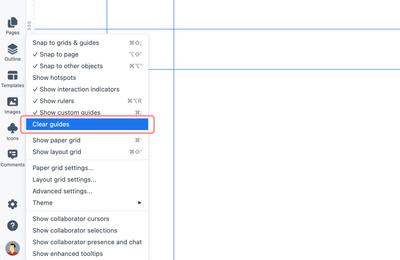
To permanently remove all guides from a selected page:
- Click the Settings button towards the bottom of the Left-Sidebar.
- Select the Clear guides option from the dropdown.
- Click OK to confirm.
If you want to copy your guides to a new page, just duplicate the page, and use the Outline Panel to remove the original content.
Page grids
Grids can accelerate your workflow by establishing clear structures and visual hierarchies for your team’s designs. This removes the guesswork – and keeps your team consistent – as they size, position and space elements across a variety of pages, platforms, and device mockups.
Moqups has two grid configurations, the Paper Grid and the Layout Grid, and they can be used separately or in combination.
Guides are visible only in Edit mode, where they serve as temporary layout and alignment tools. They will not be seen when you Preview or Export your page.
If you want to copy your grids to a new project, just duplicate the project from your Dashboard, and delete the original pages.
Show and Hide Grids
Grids are disabled by default. Before adjusting their settings, you’ll need to make them visible.
To show or hide grids:
- Click the Settings button towards the bottom of the Left-Sidebar.
- Select or deselect the Show paper grid and/or Show layout grid options.
- Your choice will apply to the project as a whole.
Paper Grid
The Paper Grid looks like traditional graph paper and consists of adjustable, subdivided squares or rectangles.
To adjust the Paper Grid Settings:
- Click the Settings button towards the bottom of the Left-Sidebar.
- Make sure you already have Show paper grid selected.
- Select the Paper grid settings option.
- From the Paper Grid Settings pop-up, adjust the width and height of the grid’s component blocks.
- Select the Draw paper grid on top of objects checkbox if you want the grid to overlay your design.
- Click Apply.
Layout Grid
The Layout Grid follows the protocols first established in print media, that set margins, columns, and gutters for your pages. Together, they can provide the underlying scaffolding for your page’s structure, and determine the amount of ‘white’ or ‘negative’ space between your blocks of content.
The Layout Grid Settings allow you to enter values and adjust these elements as follows:
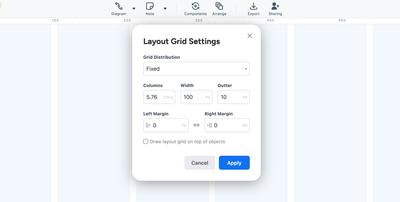
- Grid Preset: Choose between values expressed as Fixed pixel sizes, or as Responsive percentages of the page.
- Columns: Set the total number of columns.
- Column Width: Set the width of all columns.
- Gutter: Set the space between columns.
- Left/Right Margins: Set the space between the outermost columns and the page border.
To adjust the Layout Grid Settings:
- Click the Settings button towards the bottom of the Left-Sidebar.
- Make sure you already have Show layout grid selected.
- Select the Layout grid settings option to open the Layout Grid Settings pop-up.
- Set the Grid Preset and enter values to customize your grid.
- Select the Draw layout grid on top of objects checkbox if you want the grid to overlay your design.
If you’re looking to quickly align objects relative to one another, check our article on how to Arrange & Align Stencils.
Snapping and measurement
The Workspace offers a number of snapping and measurement tools to help make your workflow faster and more precise:
Snapping
All three snapping options (described below) are enabled by default, but you can turn them off, individually, in the Settings dropdown. Objects will snap to their target when they are within 3 pixels.
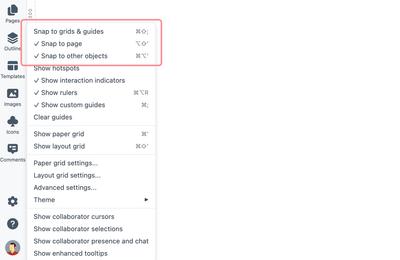
Snap to grids and guides:
Objects will automatically snap to your custom guides, or to the lines of your grids as you’ve set them:
Snap to page:
Objects will automatically snap to the vertical and horizontal page borders. They will also snap to the center of the page from both their borders and center:
Snap to other objects:
Objects will automatically snap to align with both the center and borders of other objects on the page:
Objects within a group will snap to any other objects nested at the same level.
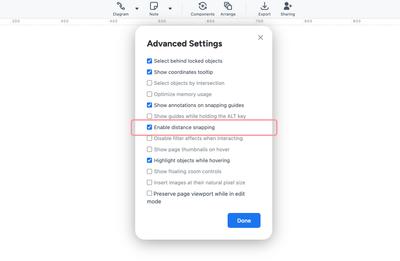
Distance Snapping
Distance Snapping lets you quickly space multiple objects equidistantly. If you have three or more objects on the page, and then align two of them, Distance Snapping will activate to help you align the rest.
To enable or disable distance snapping:
- Click the Settings button towards the bottom of the Left Sidebar.
- Select the Advanced settings option to open the Advanced Settings pop-up.
- Click the Enable distance snapping checkbox.
Measurement
When you move objects around on the page, our measurement tools can help you position those page elements precisely. Here’s how to find them, and a brief description of how they work:
To select any one of them, click on the Advanced Settings option in the Settings dropdown to open the Advanced Settings pop-up. Once you’ve clicked the appropriate checkboxes, click Done.
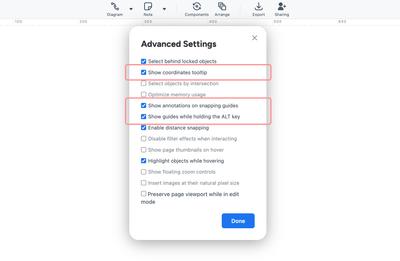
Show coordinates tooltip:
A subtle tooltip displays the coordinates of a selected object as you move that object around the page and canvas.
Show annotations on snapping guides:
As you move an object around the page, this option shows the object’s distance, in pixels, from other nearby elements.
Show guides while holding the Alt key:
Hold down the Alt/Option to display pink line-guides that show a selected object’s distance from all four page margins.
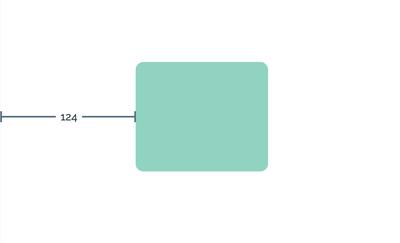
And, if you need to manually measure distance, don’t forget our handy Distance Spec stencil. Grab it from the Spec Tools category of the Stencils Panel as you need it, or leave one just outside the page border, in the canvas, for quick and handy access:
Show and hide hotspots
The Workspace dropdown allows you to show or hide all the Hotspots that you’ve added to a project as you build your prototype. You can also do this directly from the Interactions panel.
Size
To show or hide Hotspots:
- Click the Settings button towards the bottom of the Left Sidebar.
- Select or deselect the Show hotspots option.
Show and Hide Interaction Indicators
Show interaction indicators adds a lighting badge to objects with interactions – on the page and in the Outline Panel – while you are in Edit mode. You can also select or deselect this option from the Interactions panel itself.
To show or hide Interaction Indicators:
- Click the Settings button towards the bottom of the Left Sidebar.
- Select or deselect the Show interaction indicators option.
Show and Hide Live Collaboration Tools
Moqups has Live Collaboration tools to help your remote and distributed teams work together in real time.
- Live Presence lets you see who is actively collaborating on a project.
- Live Chat helps your team share ideas and clarify issues.
- Live Selection lets you jump right to where your colleagues are working.
- Live Cursors displays a colleague’s cursor as they edit.
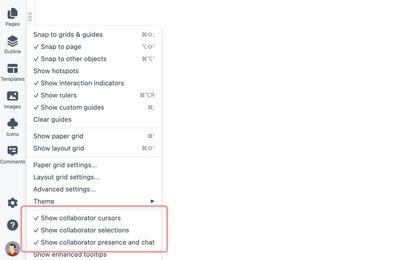
To show or hide collaborator cursors, selections, or presence and chat:
- Click the Workspace button towards the bottom of the Left Sidebar.
- Select or deselect the live collaborator options.
Questions and answers
Can I lock custom guides like I can lock objects?
No, guides cannot be locked.
Will hiding grids improve performance?
Chrome users with pages over 10,000 pixels may experience some lagging if they have the Layout Grid displayed. If this occurs, simply deselect the Show layout grid option.