In this article:
A Hotspot is a dedicated interactive object to which you can add a Page or Object Interaction.
Although Hotspots behave like other objects for the purposes of moving, resizing, grouping, and locking, they are designed to be invisible in an interactive Prototype. Accordingly, they work differently than other objects in both Edit and Preview modes:
- In Edit Mode, they appear as a translucent green overlay so that you can work with them and see where they’ve been applied. But you can also choose to hide them so they don’t get in the way of your ongoing work.
- In Preview Mode, Hotspots are active and will respond to user actions (called ‘triggers’). In Preview mode, Hotspots are invisible by default – although you can make them temporarily visible by holding down the
Shiftkey.
The advantage of using a Hotspot – instead of applying a Page or Object Interaction to an existing object – is that you can adjust its size and shape, independent of objects on the page. This means that you can add interactivity over a specific area of a page or group of objects.
Here are a couple of use cases for Hotspots:
- Apply multiple areas of interactivity to a larger, single image-upload, such as a finished design
- Define specific areas of interactivity to stencils made of multiple elements, such as menus
Add hotspots
You can add a hotspot, either at the location of your cursor or over a specific object. Or, you can draw the hotspot yourself using the Quick Draw toolkit.
Just like all the other objects – stencils, images, icons and templates – Hotspots are listed in the Outline Panel. When Hotspots are added to the page, they appear at the very top of the Outline Tree. By default, they are named by number, according to the order that they were added to the page. To change the name of a Hotspot, just double click on its current title in the Outline Tree.
Add a Hotspot to the page
To add a Hotspot at your cursor’s location:
-
With no object selected, right-click on the page and click on Add hotspot
or
Click the Add hotspot button on the Interactions Panel
To create a Hotspot over a specific object:
-
Right-click on the page and click on Add hotspot
or
Click the Add hotspot button on the Interactions Panel
-
A hotspot will appear over the object’s frame and match its dimensions
Draw a Hotspot on the page
To draw a Hotspot from the Quick Draw toolkit or keyboard shortcut:
- Click the Hotspot button in the dropdown, or press the
Hkey. - Click and drag the crosshair-cursor to create one or more hotspots.
- Add interactions by using the Interactions panel
Sticky behavior for hotspots
Sticky hotspots are very useful if you’re adding a hotspot to an element within a group of objects, or to a specific area within a single object. For instance, you might do this to create a clickable spot or button within that larger area. Then, as you rearrange the design, the hotspot will move along with it.
However, if the hotspot is exactly the same size as an object or group, you need to move the hotspot aside in order to grab hold of the object and move it. So, on these circumstances, it’s better to apply an object interaction rather than a hotspot.
By default, sticky behavior is turned on for all Hotspots, but you can turn it off in the Format Panel.
To turn sticky behavior on or off a hotspot:
- Select a Hotspot
- Go to the Right Sidebar and click the Format Tab to open the Format Panel
- Navigate to the Sticky Behavior section.
- Click the Sticky or Normal button to apply that behavior
- Drag the hotspot over the object or group to which you want it to stick
Format hotspots
After you create a Hotspot, you can adjust its size, position, or round its corners. You can also choose to hide Hotspots by making them invisible.
Size
On the page, use the resize handles to change the size of the Hotspot.
In the Format Panel, use the Width & Height inputs for precise values and fine-tuning, and use the arrow keys, on the keyboard, if you want to change these values incrementally.
Lock a Hotspot’s proportions with the Lock Aspect Ratio button. After a Hotspot is locked, you’ll have to unlock the aspect ratio if you want to resize it on the horizontal or vertical axis.
Position
On the page, select a Hotspot and drag it to the desired position.
In the Format Panel, set the Hotspot’s position by entering the exact coordinates in the input fields. Your Hotspot’s position is measured in pixel-distance from both the left and top margins. You can use your keyboard’s arrow keys to change these values incrementally.
In Preview Mode, press Shift to make the Hotspots temporarily visible so that you can locate their position.
Rounded Corners
You can round the corners of a hotspot to have it match your graphics or buttons:
To round the corners of a Hotspot:
- Select a Hotspot
- Go to the Right Sidebar and click the Format Tab to open the Format Panel
- Navigate to the Rounded Corners section.
- By default, pixel rounding applies to all corners, but you can click the Unsync corners button to adjust each one separately.
- The Scale Radius option adjusts the pixel size, in order to maintain the proportions of the rounding, as you make an object larger or smaller.
Visibility
In Edit Mode, all Hotspots on a page are visible with a translucent green overlay.
If you want to make all Hotspots invisible as you work on the project:
- Click the Interactions Tab to open the Interactions Panel
- Go to the Options section and untick Show hotspots
To make an individual Hotspot invisible, follow the instructions to Set Invisible State in the Object Interactions article.
Add interactions to hotspots
Every interaction is composed of three parts: a Trigger, an Action, and a Target.
- A Trigger is the event that sets an interaction in motion.
- An Action is an instruction that runs after a trigger is engaged.
- A Target is the final outcome that’s visible at the end of an interaction.
The process of adding an interaction to a Hotspot is exactly the same as adding one to any other object. However, in this case, the ‘object’ is an invisible Hotspot representing an interactive area on the page.
You can add either Page Interactions or Object Interactions to a Hotspot.
Check out our Page Interactions article and Object Interactions article for more information about these interactions, as well as detailed instructions about how to apply these to all objects, including Hotspots.
But if you want to get right to work, here are some brief instructions:
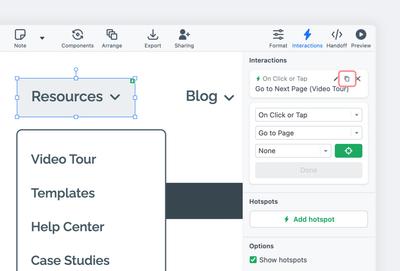
To add an Interaction to a Hotspot:
- Select the Hotspot to which you want to add the interaction
- Click the Interactions Tab to open the panel
- Choose a Trigger from the top dropdown
- In the second dropdown, select an Action from the Page Interaction or Object Interaction list
- Set a Target, using the dropdown or the crosshair button, to select an object or a page as the interaction’s endpoint.
- Click Done to apply the interaction
Edit, duplicate or delete interactions
When you apply an interaction to an object, it immediately appears in the Interactions List at the top of the Interactions Panel. As you add more interactions to that same object, you’ll see them appear there as well. You can easily edit or delete any interaction from the list – or duplicate an interaction for quick reuse.
Edit Interaction
Editing an interaction is useful when you want to change parts of an already existing interaction. By using the editing function, you can update the Trigger, the Action, or the Target individually – without affecting the other parts of the interaction.
To edit an interaction:
- Select the object or group of objects whose interaction you wish to edit
- Click the Interactions Tab to open the Interactions Panel
- At the top of the panel, locate the interaction you want to edit
- Click the Edit button to activate edit mode
- Change the interaction and click Done to save your changes
- Your updated interaction will flash green in the list for a few seconds

Duplicate Interaction
Often, you may want to apply different variations of an interaction to the same object. The Duplicate function lets you duplicate an extant interaction, and then edit its Trigger, Action and Target to suit your needs.
To duplicate an interaction:
- Select the object or group of objects from which you want to duplicate an interaction
- Click the Interactions Tab to open the Interactions panel
- At the top of the panel, locate the interaction you want to duplicate
- Click the Duplicate icon and an identical interaction will appear in the Interactions List at the top of the panel
- To edit the new interaction, click on the Edit button and follow the steps from the Edit Interactions section of this article
Delete Interaction
To delete an interaction:
- Select the object or group of objects from which you want to delete an interaction
- Click the Interactions Tab to open the Interactions panel
- At the top of the panel, locate the interaction you want to delete
- Click the Delete button
