Moqups ease of use and flexibility makes it the perfect tool for companies and agencies with cross-functional teams. Product managers can quickly bring everyone on board, and manage projects all in one place.
But aligning a multi-disciplinary team can also be a challenge. To set realistic deadlines – and actually meet them – managers need to figure out where everybody is, prioritize what matters, and track progress.
Page labelling is a powerful project management tool that can help with all of that. It can improve collaboration and visibility between departments – and make both planning and execution easier.
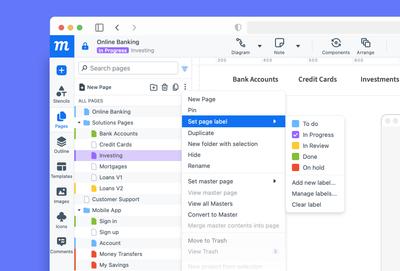
If you're subscribed to our Team or Unlimited plans, you’ll find our new labelling feature in the Pages panel. It’s available in the 'More actions' menu or as a right-click option.
Both new and old projects automatically load with a default set of status labels and colors that you can apply right away.

If you want to customize your workflow to suit individual teams, departments, or customers, you can also edit or add your own labels. By standardizing what works best for your project, you can quickly create a repeatable – and predictable – process that delivers projects on time and on budget. And, by filtering pages by labels, your team can cut through the noise and focus on urgent, current work.
Here’s a quick primer on how to set, add, manage, and filter labels:
Set page labels
The quickest way to set a page label is by double-clicking on the page icon itself and choosing a label from the dropdown. To remove a label from a page, just use the ‘Clear label’ option from the same menu.
You can also access the dropdown by selecting ‘Set page labels’ from either the ‘More actions’ button or the right-click Context menu.
Create labels
You can create your own custom labels by selecting any page and choosing the ‘Add new label’ option. If the selected page has no current label, the new label is automatically applied to that page; if the page already has a label, it retains its status when the new label is added to the dropdown.
Manage labels
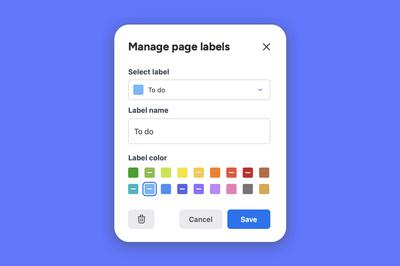
The ‘Manage labels’ option allows you to change the name or color of an existing label, or remove it from the legend by deleting it altogether.

Filtering pages by labels
Finally, one of the most useful aspects of this feature is the ability to filter pages by their labels. This allows you to drill down on the specific work at hand.
Just click the ‘Filter by labels’ button at the top right of the Pages panel, and select which labelled pages you wish to view. To remove the filtering, click on the ‘Clear filter’ option at the bottom of the same dropdown.
We know that one of the toughest challenges in product management is to bring all the moving pieces of a project together.We hope page labels will make it easier to plan, execute, and track big projects by helping you create assets and manage workflow all in one place!
As always, please let us know how you like the feature, and send us your suggestions about how to improve it!


