Maybe you’re thinking about a career in UX design. Maybe you've just started your first project. Or, you may already be an experienced professional who just wants to up their game and streamline their design process.
Either way, this quick primer is designed to demystify website wireframing, answer key questions, and show you how to best integrate wireframes within your development process.
Here’s what we’ll cover:
- What is a website wireframe
- Wireframes vs mockups vs prototypes
- When to go low-fi or hi-fi
- Benefits of wireframing
- When to wireframe
- A step-by-step guide
- Wireframe templates and examples
- Why choose Moqups
What is a website wireframe?
In website design, the term ‘wireframe’ refers to a rough sketch of a webpage, often done early on in the design process. Wireframes can be drawn with pen and paper, but are more commonly created online, with software like our own.
The point of a wireframe is to establish the basic layout of your web pages using simple shapes, placeholders and generic ‘lorem ipsum’ text. Wireframes are normally done in grayscale and deliberately exclude specific design details – like the colors, fonts, photos, illustrations or logos – that will ultimately be part of your branding.
The reason for this rough, first-draft approach is to give the UX design team a chance to consider basic questions of layout, functionality, and navigation before worrying about detailed visual design elements.
Stripping a design down to its most basic building blocks is a pragmatic approach that puts the focus on user experience – before making final decisions about design aesthetics.
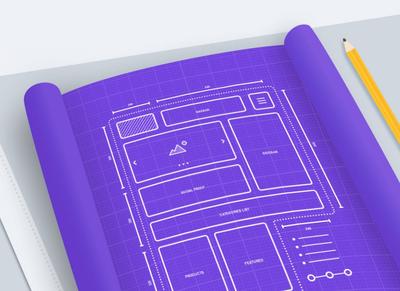
Wireframes are analogous to the blueprints used in early stages of housing design. Before entering into discussions of brick texture, paint color, lighting fixtures, or floor coverings, an architect works with homeowners to decide on much more basic questions.
How many bedrooms will the family need, and on how many floors? Should the bathrooms be ensuite or commonly accessible? Will the kitchen be open to the living space or separated?
Most importantly, how will the family flow through their future home? And what amenities should be near-at-hand to help make their experience of the house both easier and more intuitive.
Architects use initial floor plans – and then more sophisticated blueprints – to capture these requirements. They establish these basic rules before ever engaging the builders and designers who will, ultimately, bring this home to life.
Web design works in a similar way. Early in the process, UX designers work with clients, stakeholders, and end users in order to answer the most basic questions about the intent of the website – and the purpose of individual pages within it.
Inevitably, this process involves lots of experimentation and iteration. So, during this experimental period, it’s counter-productive to invest in pixel-perfect designs.
It’s a waste of both time and money to invest in a polished user interface since it’s likely to change, in substantial ways, especially in response to ongoing feedback. After all, the team will want to consider all voices, seek input from colleagues and stakeholders, and make ongoing changes as they move towards consensus.
In these early stages, it’s more effective to work with the skeletal framework of the website in order to avoid the sunk-cost fallacy of committing too heavily to a polished design that’s only destined to change.
So much of this early design work involves back and forth communication of ideas, specifications, annotations and requirements. Wireframes help teams collaborate in the simplest, clearest and most cost effective fashion.
Wireframes vs Mockups vs Prototypes
As our previous article Wireframe vs Mockup vs Prototype explains, these terms represent distinct stages in the design of websites and mobile apps.
Think of a spectrum of both fidelity (the degree of detail in the design) and interactivity (the degree to which a viewer can interact with the design).
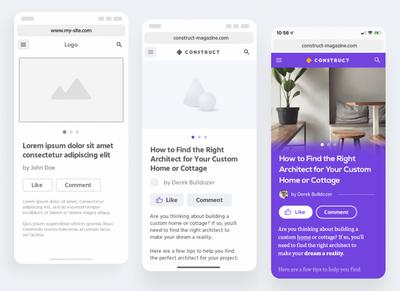
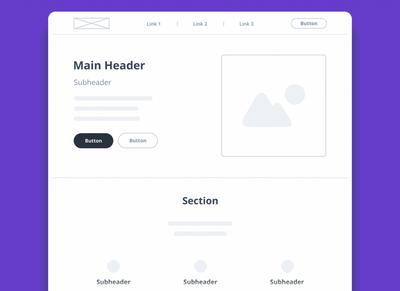
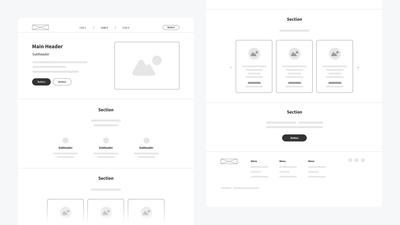
At one end is the low-fidelity wireframe. In its purest form, it is rendered in monochrome, and uses generic placeholders to represent the eventual design elements, images and text. It’s normally static, meaning UI elements like buttons, links, and dropdowns are not clickable.
At the other end is the high-fidelity prototype. It’s so pixel-perfect that it’s nearly indistinguishable from the final product. It’s branded with logos, colors, images and copy. And it is almost fully interactive – enough that a user can realistically click through the UI in order to test the eventual product it mimics.
Somewhere in between these two poles lies the medium-fidelity mockup. Mid-fi mockups are higher on both the fidelity and interactivity scale than lo-fi wireframes, but lower than full prototypes. As such, they may include working versions of the content and copy, and a few hi-fi elements. And, although they may incorporate some basic page interactions, most of the UI remains unclickable.
Website and mobile app design typically moves from wireframes to mockups to prototypes. However, experienced UX and UI design teams choose whatever level of fidelity can best help them reach consensus, get sign-off from their stakeholders, and communicate requirements to the development team in the clearest and most cost-effective way possible.
Low fidelity vs high fidelity? Which to choose?
If you want to explore the issue in full depth, check out our dedicated article, Low Fidelity vs High Fidelity Wireframes: Which should you use? In the meantime, here’s a summary and some key observations from that post:
Low-fidelity wireframe
The purpose of a lo-fi wireframe is to keep the focus on function rather than aesthetics. That way, you can work out the basic flow and functionality of your site – before costly content is commissioned.
Since basic wireframes are quick to build, your team can experiment freely, respond to feedback, and get early buy-in from stakeholders. But because they’re not as inspiring as hi-fi prototypes, they aren’t well suited for final investor pitches.
High-fidelity wireframe
A hi-fi wireframe can mimic the exact look and feel of an app or website before it’s actually developed. That makes it easy to deliver precise requirements to your dev team. And, by adding interactions, you can create a thrilling, clickable prototype for pitches and user testing.
But, because this degree of fidelity requires polished content, it demands much more time and effort – and needs a longer timeline. Additionally, a perfectly polished product can sometimes discourage substantial feedback from stakeholders. Our article, High-Fidelity Wireframes Explained by our Designer: Uses and Examples, goes into more detail – with a lot of great insights about working in hi-fi.
What are the benefits of wireframing a website… and why is it so important?
Wireframing is truly a win-win-win proposition: Clients get better websites, users get better experiences, and agencies save money. Here are just a few of the reasons why:
Wireframes streamline the design process for teams:
- With wireframes, you can establish the basic flow, functionality, navigation and density of your website before investing time and money in hi-fi graphics and copy.
- Working in lo-fi encourages open-minded experimentation because every member of a cross-functional team can get involved.
- Wireframing also provides a great mechanism for vetting ideas and getting buy-in early in the design process.
- Lo-fi drafts lets you iterate painlessly in response to feedback, without the costly redesign of polished assets, or time consuming changes to code.
- Eliminating needless back and forth helps maintain momentum, reduce frustration, and improve team morale.
Wireframing produces better websites for clients and customers:
- A better design process results in a better product because it allows for rapid, clear and cost-effective communication.
- In the early stages of website design, wireframing helps all the stakeholders show and tell, giving concrete shape and form to abstract ideas.
- Wireframes help analysts ensure that essential business requirements are reflected in the fundamentals of the design.
- Clients often have unrealistic expectations about how much content can be included on each page of a website, so working with rough drafts of the layout can help answer basic questions about density and intent.
- By experimenting with different design options, UX designers can reduce friction, boost retention and conversion, and improve customer experience.
When to use a website wireframe?
The basic principle of wireframing – to keep things fast and simple – is applicable anywhere along the design and development process. Here are some key use cases:
1. At the eureka moment
Wireframing is a great way for creators and founders to get fresh concepts out of their head – and onto the page – before they slip away. Wireframes give shape to scattered ideas, so you can present them in an organized fashion.
2. For early validation
There’s nothing more frustrating than having a great idea, but communicating it badly. Even the most basic wireframe can be transformative for initial pitches to friends, family, and early investors. During this fragile, exploratory stage, wireframes can help you connect with your first audiences by making your abstract concepts tangible.
3. Before you build a team
As you move from ideation to realization, you’ll want to assemble your team. To attract the right people, you’ll need to convince them that your concept is viable, clear, and credible. An effective wireframe can help communicate that vision and inspire enthusiasm.
4. At the beginning of the design process
Going lo-fi is great in the early stages of design. Because wireframes are quick and easy to build, your team can experiment freely. No one will feel like they are ‘breaking’ anything when they try out new ideas, or fool around with the layout. And, because time has yet to be invested in making things pixel-perfect, changes are relatively painless at this point.
5. To establish consensus with clients
Rough drafts are great for working out ideas, exploring competing layouts, and thinking through the implications of these options. Until you’ve got buy-in on basic page structure, there’s no point in preparing graphics or polishing text – only to discover it won’t fit into the final design. Putting the cart before the horse can result in premature work that’s only destined to be tossed away. Needless effort is a recipe for high costs, low morale, and dissatisfied clients.
6. Working on new content
When you add new features or functionality to your site, many of the branding and design decisions may already have been made. But there will still be a whole raft of competing choices yet to be resolved: dropdowns vs lists, radio buttons vs checkmarks, balance of graphics vs copy, table vs chart, headline options, etc. All of those can be best understood – and decided upon – from mockup or wireframe.
7. Updating the site and maintenance
Especially in an agile world, websites are being constantly refreshed to reflect new products, personnel, policies, trends, and user needs. Every change needs approval before being shipped. Taking a quick screenshot of a current page, and mocking it up to reflect updated content is the quickest way to get approval – and speed rollout.
Basically, there’s no wrong time to use a wireframe. Any time you make a fundamental decision that might be difficult – or expensive – to reverse, it makes sense to get stakeholders on the same page with the wireframing process.
How to create your first wireframe with Moqups in 10 steps
If you’re new to our app, check out our short tutorial video for a fast tour of our app.
With Moqups you can quickly build a wireframe for all kinds of websites and landing pages: e-commerce, blogs, courses and webinars, partnerships, affiliate marketing, careers, contests, educational sites, mobile apps, and more. Just go to moqups.com and create your free account. No credit card is required. Then, use the following step-by-step guide to help you create your first wireframe!
1. Determine the goal of your website
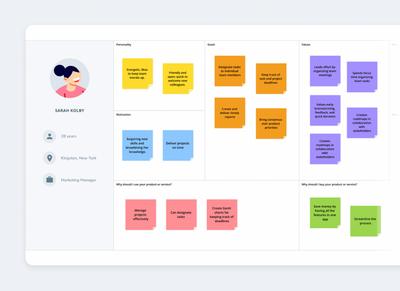
Brainstorm to determine your website’s overall goal, and the purpose of each individual page. Is it to sell, inform, generate leads, get visitors to sign up, or request a demo? It’s important to align your team around your own business requirements before you get started. But it’s equally important to understand your visitors’ goals. Building user personas and an empathy map can help your team imagine what visitors will want from your site, and how they’ll interact with it.
2. Map out the scope of your website
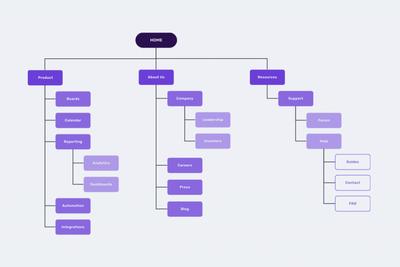
Create a sitemap diagram to establish the information architecture and taxonomy of your site. At this point, you can begin to discuss what information needs to be both communicated and collected. And think about what your ideal page density might look like. Those decisions will help determine the scope of the site, how many pages you’ll need, and in what configuration.
3. Think about the optimal user flow
Build user-flow diagrams to map out the optimal visitor journey through your page hierarchy. This will keep the focus where you want it – on user interactions with your screens. Keep your personas in mind as you work to reduce friction, and make the user experience as effortless as possible.
4. Do some competitor research
There’s no point in trying to reinvent the wheel. Before you start working on your page layout, take a look at both templates and competitor sites. Look at both near and far competitors – as well as other websites whose design and UX you might admire. This will give you a pretty good sense of best practices in your domain. You can even try reverse engineering their strategies to help you decide on your own.
5. Create your first draft
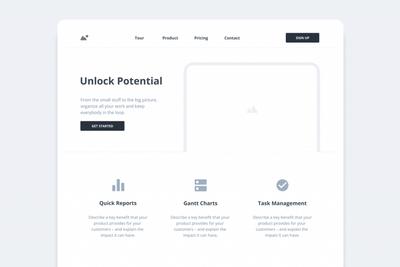
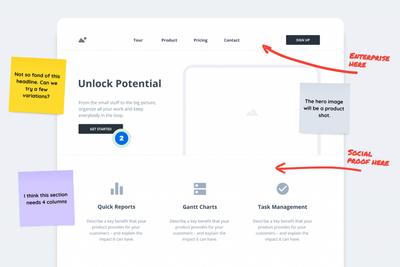
Using our drag and drop page elements, start designing your pages. Depending on your workflow, you can sketch out a rough wireframe first, or begin with a more precise idea of where each design element will go. Build up your website wireframe design with placeholders for logos, headers, navigation and breadcrumb systems, sidebars, headings and subheads (H1, H2, H3), body content, pics, illustrations, video, buttons, icons, avatars, footers, contact info – and the all important CTAs!
6. Get content creators involved
A benefit of wireframing is that you can work out a design before commissioning expensive content. But it’s also helpful to get copywriters and illustrators involved as soon as you can. Going beyond ‘lorem ipsum’ – even if it’s just a placeholder like “Punchy Four Word Title!” – can help determine your title hierarchy and prevent text overflow. And dropping rough sketches onto the page can help copywriters match text to artwork. There’s a symbiotic relationship between content and design, so having writers and artists involved in wireframing saves back-and-forth later in the process.
7. Solicit feedback and annotate
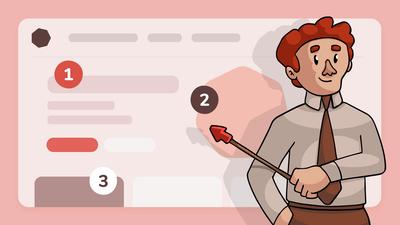
When to ask for feedback will depend on your own design team workflow. But, as a general rule, it’s good to get comments on your wireframes as soon as you can. That’s when it’s easiest to accommodate new ideas – or even change direction. Team members can provide advice, but it’s also worth checking with end users to make sure you haven’t overlooked any functionality or usability issues. And, it’s good practice to document business and technical requirements by leaving notes and annotations right on the page. This helps eliminate ambiguity as your design takes its final shape.
8. Iterate freely and frequently
You can create multiple versions of your layout in order to experiment with alternative approaches, flows, and options. But you may also need to create multiple iterations to reflect different screen sizes and responsive layouts. In both cases, take advantage of the wireframing stage to explore new ideas and cover all bases. Keep iterating until you find consensus – and until both your team members and stakeholders are satisfied.
9. Add branding and hi-fi elements
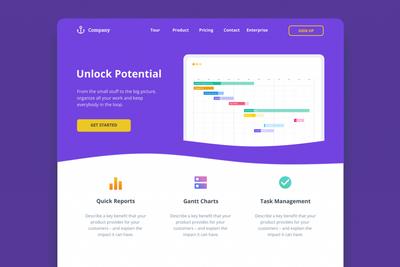
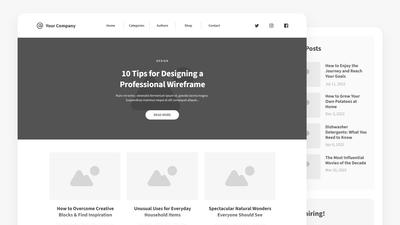
Once you have the foundational elements in place, you can start bringing your design to life by adding logos, color scheme, fonts, typography, icons, pictures, illustrations, and graphics. With the addition of these elements, your wireframe becomes more of a mockup and, eventually, a prototype. Since this stage is the last, best opportunity for last-minute tweaks, live collaboration can help your team iron out the final details.
10. Add interactions, present and test
At this point, your design should be almost pixel perfect. Now you’re ready to test with users, present to investors, and hand off to developers. The last step is to add basic interactions and make your design clickable. The more your prototype mimics your eventual product, the more effective your user feedback and testing will be.
Wireframe Templates and Examples
There’s no need to start from scratch. You can kickstart your project – and take advantage of current best practices – with one of our professionally designed templates. Choose from desktop or mobile wireframes, and from 100+ diagrams, charts, graphs, user experience flows and business frameworks.
Here are a few wireframe examples that might help get you going. Click on any of these thumbnails to start:


Why Moqups is Great for Making Wireframes
Moqups is simple to use and easy to learn – but it’s also much more than just a wireframing tool.
To check how Moqups compares to other popular wireframing tools, check out our article on Top Figma Alternatives.
Brainstorm with whiteboards, get inspired with moodboards, plan with strategic frameworks, create sitemaps and flow diagrams, build up user personas, and take your design all the way from concept to creation. Moqups is perfect for every step in the wireframing process.
And, since Moqups is designed with real-time collaboration in mind, every member of your team can get involved. Our app is cloud-based, so it’s perfect for remote or distributed teams working sync or async. Team members can contribute from anywhere – right in their browser – to edit together live, annotate, and leave comments right on the page.
Why not try it out for yourself?
It’s free to get started with no credit card required.