We’re proud to introduce two really terrific new features. Both are designed to help you work faster and more reliably with multiple objects:
- Resize Constraints for objects in groups
- Bulk Transform for a selection of objects
We’ve developed these tools as a result of your feedback and requests, but also because they’re helping our own team create better stencils and templates for our users.
- What are resize constraints?
- How do constraints help the wireframing process?
- How do I use resize constraints?
- What is bulk transform?
- How can I use bulk transform to improve my workflow?
- What’s coming next?
Resize Constraints
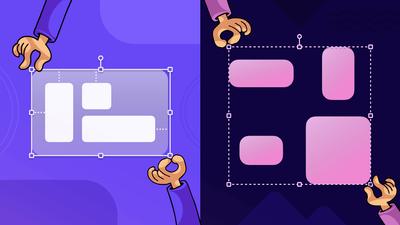
What are resize constraints in Moqups?
Constraints allow you to anchor the various elements of a group to the top, bottom, sides, and center of that group as a whole. This means that, as you resize the group, the elements within it will remain in logical and predictable positions. In simple terms, your design elements won’t ‘break’ as you change a group’s size and shape.
It’s important to note that constraints can only be applied to grouped objects (i.e. not a selection of objects). Also, if you nest a group within a parent group, constraints can be applied to the nested group as well.
Here’s a quick overview to get you started, but if you want a deeper dive, check out Resize Constraints in our Help Center.
How do constraints help the wireframing process?
- Constraints make it much easier to adjust layouts for responsive design, from desktop to tablet to mobile.
- Constraints allow you to build reusable UI components that can be repurposed in a variety of different contexts. For example, if you create design elements to use on a variety of webpages, dashboards, and devices, constraints make it easy to adapt these groups to those layouts. This is especially important if you’re using syncable components and design systems.
- If your team creates apps for on-site commercial and industrial monitoring, adding constraints allows you to quickly adjust designs for those specific, proprietary devices.
We’re particularly proud of this feature because it’s normally found in more specialized design tools like Figma. But we also felt it was important to have constraints as part of the Moqups toolkit. So many of our clients take projects all the way from lo-fi wireframes to hi-fi prototypes, and we wanted to give them better control over their layouts at every single stage in that process.
As part of this release, we’ve also improved the precision of resize in general. For instance, we now respect the aspect ratio lock on all objects when resizing, and have made it much easier to adjust the dimensions of grids and cells.
How do I use resize constraints in Moqups?
In Moqups, Constraints are turned off by default. This means that, as you resize a group, the objects within that group will stretch (if their aspect ratio isn’t locked).
If you do want to use constraints to anchor elements within a group, you first have to enable the feature for that specific group.
The exception would be some of our latest compound stencils, like our new iOS 26 kit, that come with constraints both built in and enabled.
Enable resize constraints
To enable constraints, you first need to click on a group. Doing so will open the Format panel, and also reveal the group’s contextual toolbar. Then, you can either:
- Select the ‘Enable resize constraints’ checkbox in the Format Panel
- Click the ‘Enable resize constraints’ button in the contextual toolbar
This will enable our Automatic constraints feature. If you want to override the automatic settings to apply manual anchors to individual objects, you can do that too. We’ll cover manual constraints further downscroll.
Automatic constraints
After you enable constraints, anchors are automatically applied to each object within the group. If you resize the group, automatic constraints should be sufficient to maintain a logical layout for most use cases.
You can see these anchors in the Constraints section of the Format panel: applied anchors are highlighted in blue and, on the page, dotted blue lines show where a selected object is anchored.
Manual constraints
You can always override automatic constraints to select manual anchors for objects within the group. To apply manual constraints, select an object inside the group and click on an anchor button to apply it to that object.
For instance, in the example below, we manually anchor the ‘Cancel’ button to the right in order to keep it adjacent to the ‘Submit report’ button when we resize the layout.
Anchors can be applied both horizontally and vertically and, if you hover over any anchor button, a tooltip will explain its purpose.
If you want to go back to automatic anchors for an object, just re-select the ‘Adjust automatically’ checkbox.
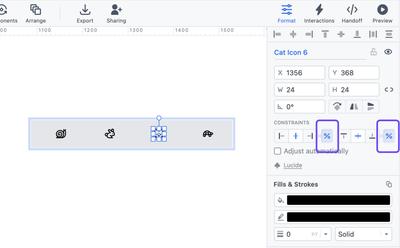
Proportional constraints
To set proportional constraints for an object, click the percentage symbol at the end of the anchor buttons. This option will adjust the object’s distance from each anchor point proportional to any resize.
Here’s a quick visualization of how proportional constraints work compared with the other resize options.
Constraints for nested groups
When you enable resize constraints for a parent group, any nested groups are treated like individual objects of their own, and can have either automatic or manual anchors applied to them.
If you want to set anchors for objects within those ‘child’ groups, you’ll need to enable constraints for them separately. After that, you can set anchors for objects within the nested group, just as you would for the larger, parent group.
Bulk transform
What is bulk transform in Moqups?
Our second new feature is a bulk transform option that applies to multiple, selected objects. The drive for this feature came internally, from our own team’s experience with whiteboarding and planning.
Since we use Moqups for brainstorming, flowcharts, and Kanban boards, we wanted the ability to quickly resize multiple objects on the page – especially sticky notes and diagram blocks.
Below, you can see an example of how we use bulk transform – in combination with our align tools – to quickly clean up our board.
Initially, this tool was intended to apply only to resizing. All we really wanted was a quick way to clean up a page by standardizing object dimensions. But, in the end, we decided to extend it to all transform options (x y coordinates, widths and heights, and rotate) to give users even more control.
How can I use bulk transform to improve my workflow?
Bulk transform is a terrific tool, not just for whiteboards, but also for the fast adjustment of any UI layout. Here are a few examples of how this new feature might help your workflow:
- After group brainstorming, bulk transform lets you standardize the dimensions of your sticky notes, and align them in straight rows or columns.
- As you build a diagram and adjust elements to fit the text, things can get messy. Inevitably, you end up with blocks of different sizes and proportions. Once you’re done, bulk transform makes it easy to make those elements the same size and apply some visual consistency.
- During initial wireframing, you don’t want to worry about the size of every icon, graphic or card you add. You just want a fast, rough draft. But, once you’ve decided on the optimal layout, you probably want to match both the size and position of repeated elements to bring a more professional look to your design – especially as you move from low to mid or high-fidelity.
How do I use bulk transform in Moqups?
To use Bulk Transform, first make sure the feature is enabled in the Format panel. Then, select multiple objects by dragging over them or use Shift + Click to select them individually. Now you can enter new values for width and height (or for their X/Y position).
If you want to apply the size of one object to a bunch of others, you can do that too!
First, make your selection. Then, click on any object within the selection to designate it as the reference object. The reference object will be highlighted with a thick blue outline, and its dimensions and position will appear in light gray in the format panel.
Then, to apply any of those values to the other objects in your selection, just re-type those exact numbers over the grayed-out values, and hit the Enter/Return key.
Head over to our Help Center if you want more details about our Bulk Transform feature.
What’s coming next?
At the beginning of this post, we mentioned that one of the motivations for developing our constraints tool was so that we could build better stencils and templates for our users. That’s already under way.
A completely updated iOS 26 UI kit, with resize constraints applied, is already live in-app. You can find them in the Stencils panel, in both light and dark mode. And our in-house designer is working on revamping the Material library too. We’ll highlight both of these in a future blog post.
In the meantime, please let us know how you like these two new features, and pass on any suggestions to support@moqups.com.